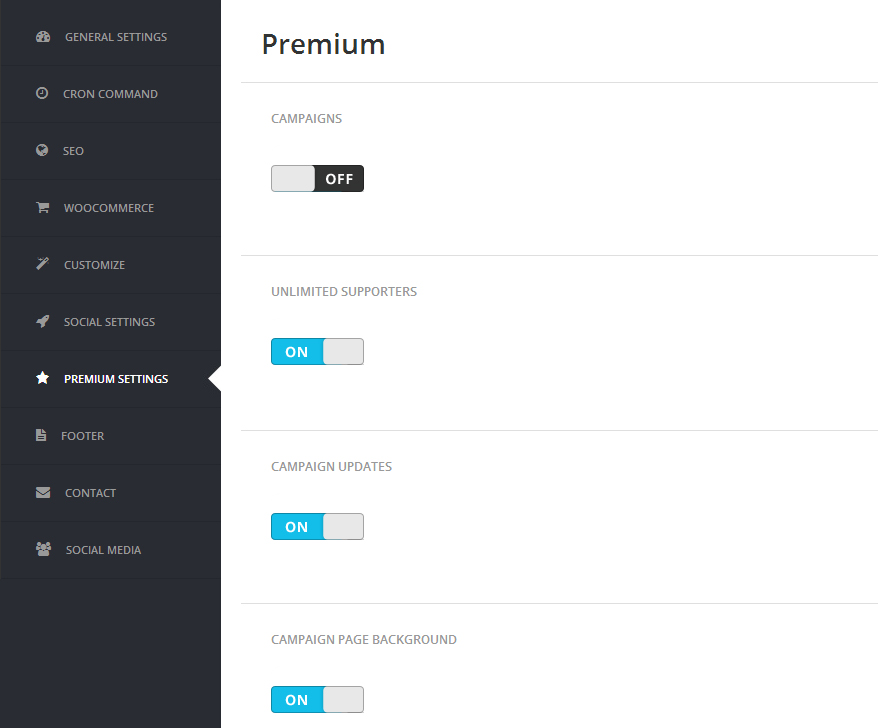
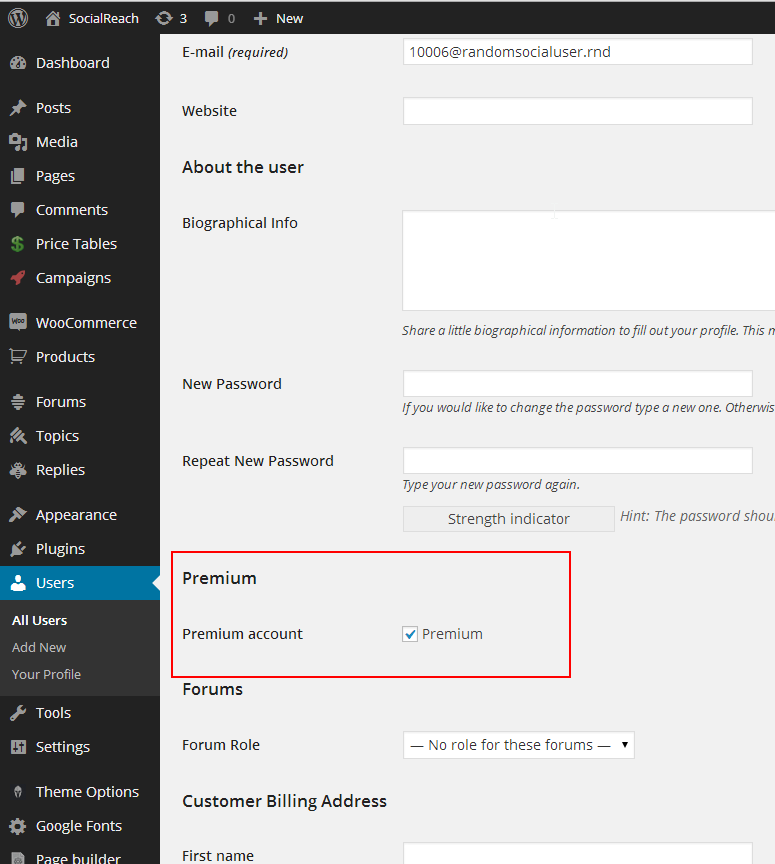
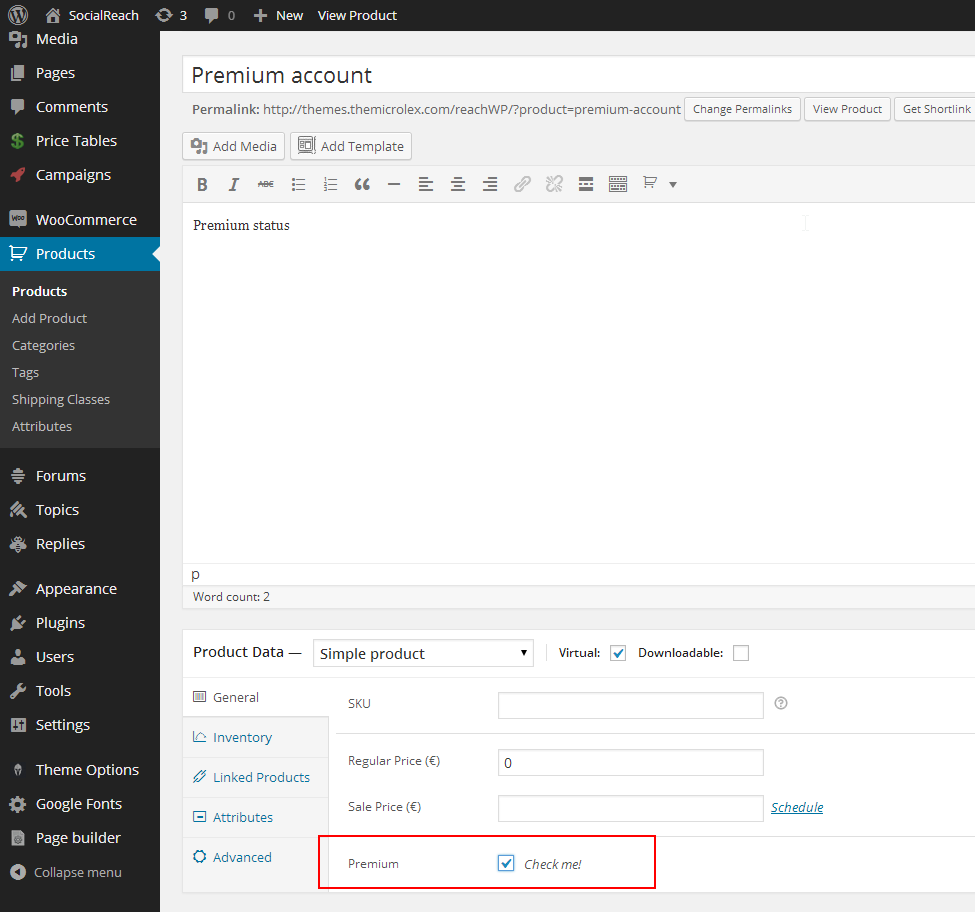
- Support: support.skywarriorthemes.com
To view this theme in its full beauty please use Chrome or Firefox. IE makes kittens cry and everybody loves kittens... right?
Installation
To install this theme you must have a working version of WordPress already installed. For more info on how to install WordPress please see the WordPress Codex: http://codex.WordPress.org/Installing_WordPress
Extract the zipped package downloaded from ThemeForest to your desktop, in the extracted package you will find the Socialreach.zip file which is the WordPress theme.
You can install the theme in two ways:
-
FTP: Extract Socialreach.zip file and upload the extracted folder to the /wp-content/themes/ folder on your server. For safe transfer of files set transfer mode of your FTP client to binary.
WordPress: Navigate to the Appearance -> Add New Themes -> Upload page. Select the Socialreach.zip file. Press the Install Now button to upload and install the theme.
After uploading the theme, you have to activate it. Navigate to the Appearance -> Themes page to activate the theme.
Changing the URL structure
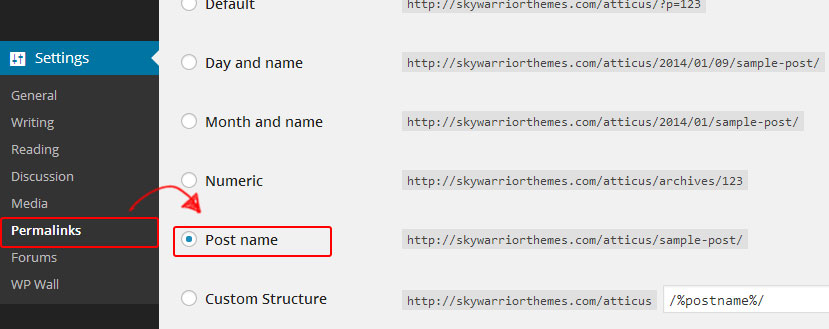
To change the URL structure so the URL looks more user-friendly (also is better for SEO) navigate to Settings -> Permalinks and under 'Common Settings' select 'Post name' or any other option EXCEPT default.
Installing the demo data - One Click Install
To do this you will need to head to Theme options -> One click install:
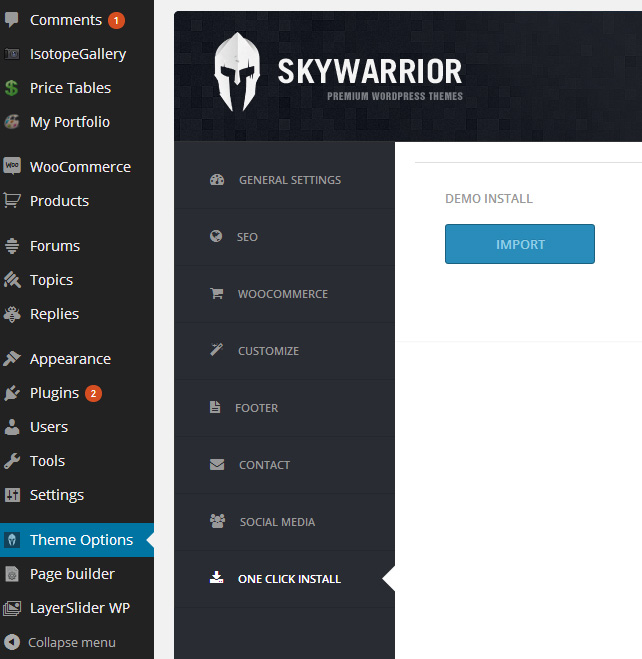
Once there, click on the import button. Please do not navigate outside the page once the data is importing.
After the data is successfully installed a success message should pop up and the button should be grayed out.
Admin panel options
To customize the look and feel of Social Reach you need to use the Theme Barracks panel (Theme Options):
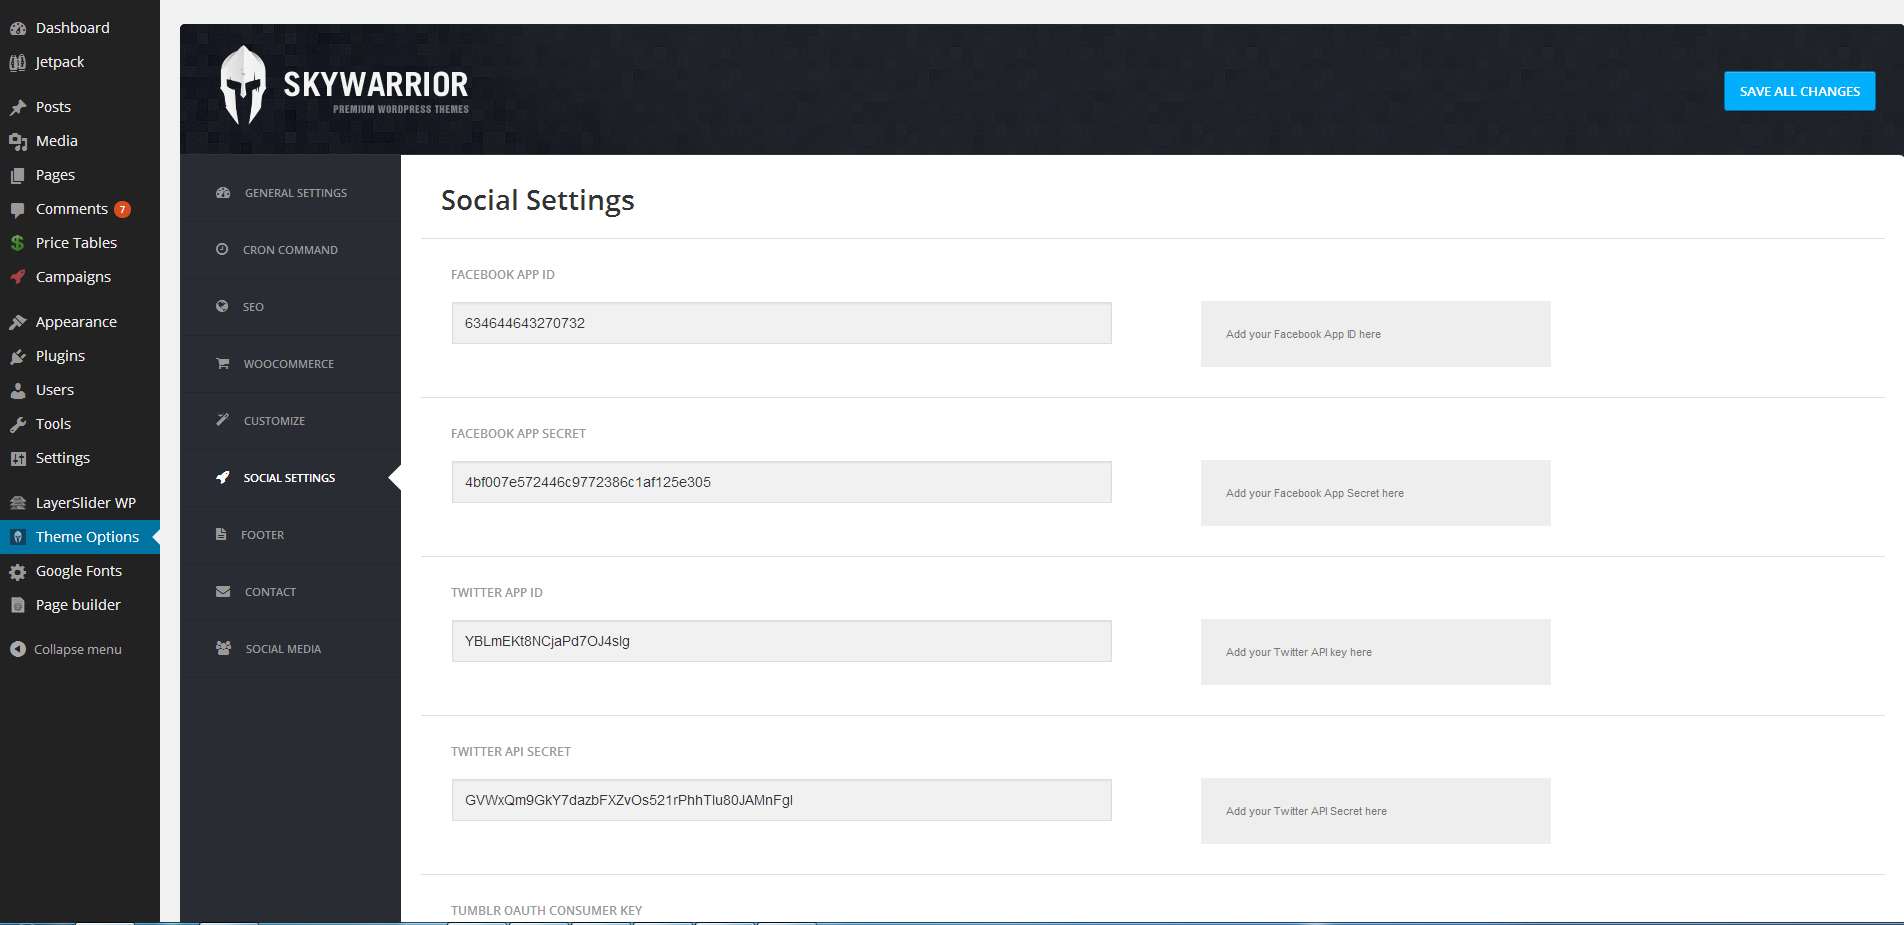
General settings
Inside the General Settings tab you will be able to customize the logo and favicon (small icon that appears in the browser tab) by uploading your own images. Also there are the blog and privacy settings giving you control over the quantity of information being show.
Cron Command
Inside cron command tab you will find cron command that you need to use to setup new cron job in your cPanel. Best interval for cron job is 10 minutes. For more about how to setup cron job you can find in our video tutorial: Setting a cron job in cPanel.
SEO
Some basic SEO options for your site. Fancy some more customizable SEO plugin? We recommend All in One SEO Pack plugin for Wordpress, its free and awesome!
WooCommerce
Different layout options for the WooCommerce page
Customize
Look and feel customization options for the theme. Include: Backgrounds, colours and menu
Social Settings
Here you will need to set your social application credentials. For more about how to create applications on social networks please check our video tutorial Create social apps in different social networks.
Updated: Setting up social settings with Facebook api v2
Tumblr Application website link:
http://yourdomain.com/wp-content/themes/socialreach/include/handler/
Tumblr Default callback URL:
http://yourdomain.com/wp-content/themes/socialreach/include/handler/?hauth.done=Tumblr
Footer
Information related to the footer: copyright text and logo.
Contact
In this section you can enter the email and subject of the messages you will receive from the contact page and google map settings to be able to set up your own custom marker.
Social media
You can enter and enable or disable your social links in this category.
Setting up shortlinks
Special mention: Backgrounds
As you just read in the previous section, you should easily be able to upload the background that you want under the Customization tab in Theme Barracks.
As you may have seen there is also the option to make the background footer repeat, this option will allow you to have a repeated pattern underneath the header background should you wish to do so.

Finally, unfortunately we cannot sell the images that you see in the demo for copyright reasons. However, if you are interested in them you may be able to find some help in the support forum ;)
Slider
The plugin used in this theme is the LayerSlider Premium WP slider which you can find by clicking here
You can find the documentation of the slider by clicking on the documentation link on the top right side when creating a slide.
Also here is a video to get you started made by the author himself.
Google Fonts
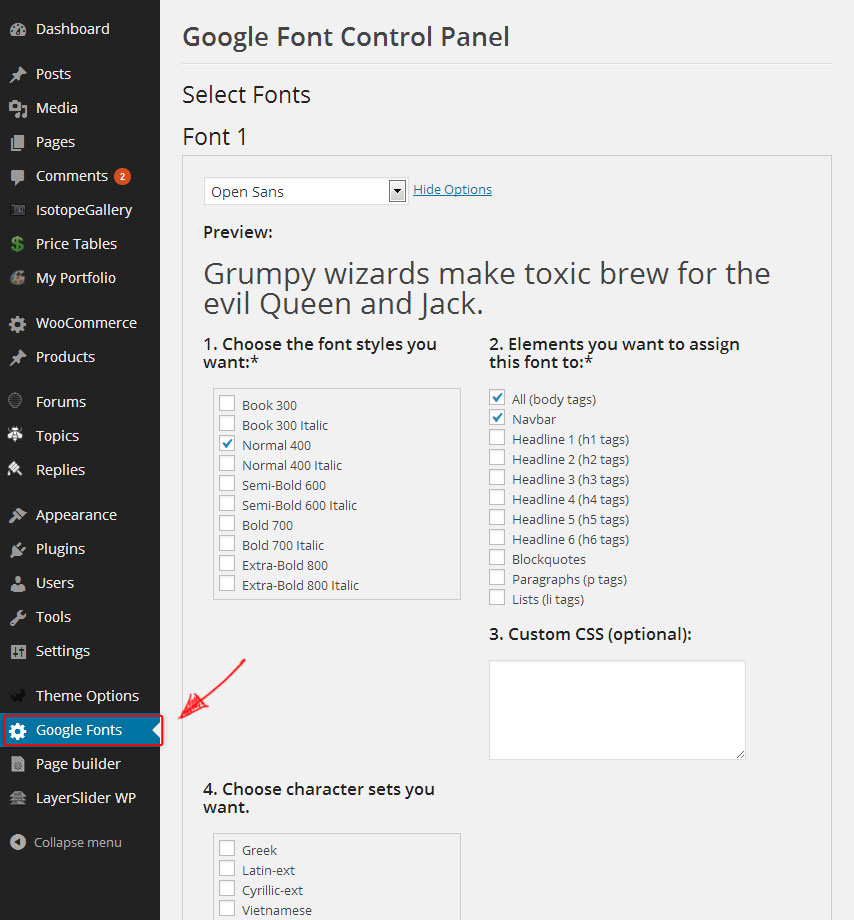
Google fonts are included in the theme! Now you can choose between more than 600 fonts from Google databases.
To do this click on Google fonts tab in the main menu of Wordpress. You will be able to choose different fonts and sizes for the headers and body fonts.
How to create a page (with page builder) - Watch the video!
Creating pages is now easier than ever with the page builder:
- Head to the page builder tab inside the WordPress admin panel.
- Add any blocks you want by using drag and drop.
- Customize the block as you want.
- If you want resize them to fit the columns that you select. Please note: do not resize the "Latest campaign" block, it is made to be full width.
- Save the template.
- Navigate to the page where you want the page template to appear and paste the code in there.
- That's it! You can also add text or a slider to the same page you have the blocks template!
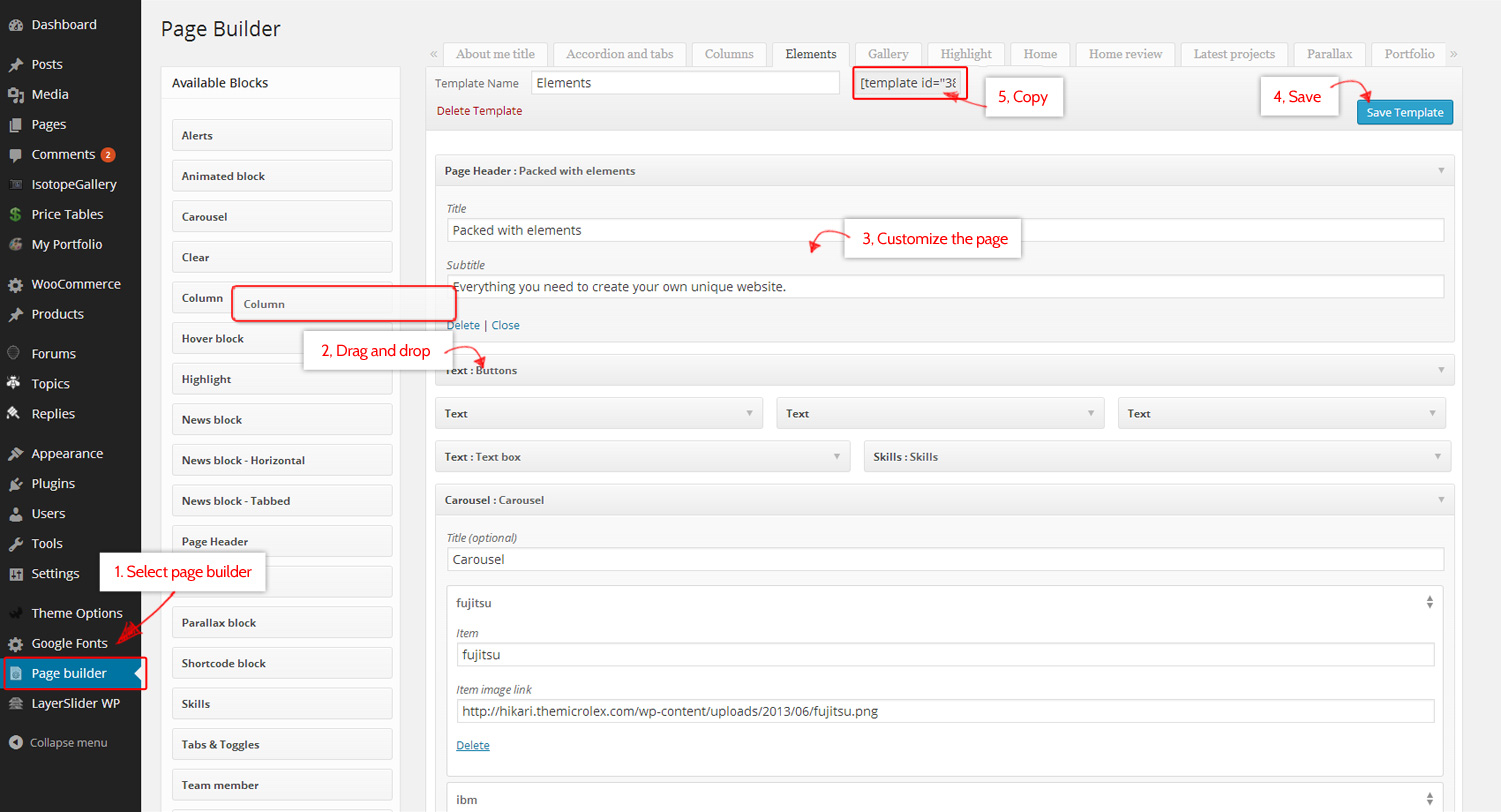
After following the above steps you should have a page template created. Now copy the template id as seen bellow:

Special mention: Parallax and columns
Column and Parallax blocks wrap around other blocks so do not used them by their own, they always need blocks inside. In another note, please use Parallax full width.
Special mention: Custom backgrounds
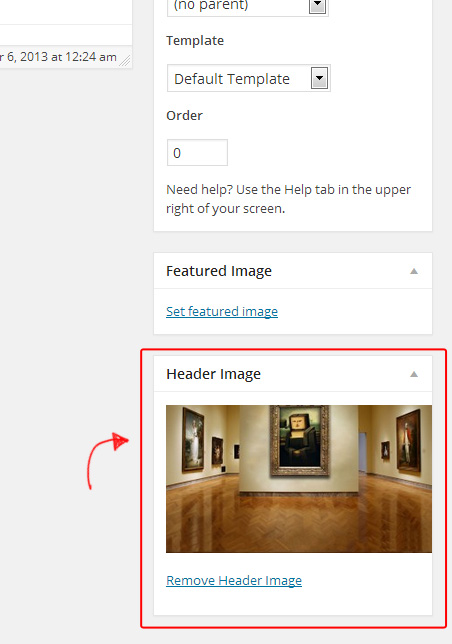
You can assign custom backgrounds to individual pages by uploading the image you want in the header image block. You can find it in the right bottom side of the page underneath feature image.
Campaigns
After users start creating campaigns in your site, you will see this page being populated. Campaigns created by users need to be approved manually by the admin to avoid spam and other possible obscenities troll users may create.
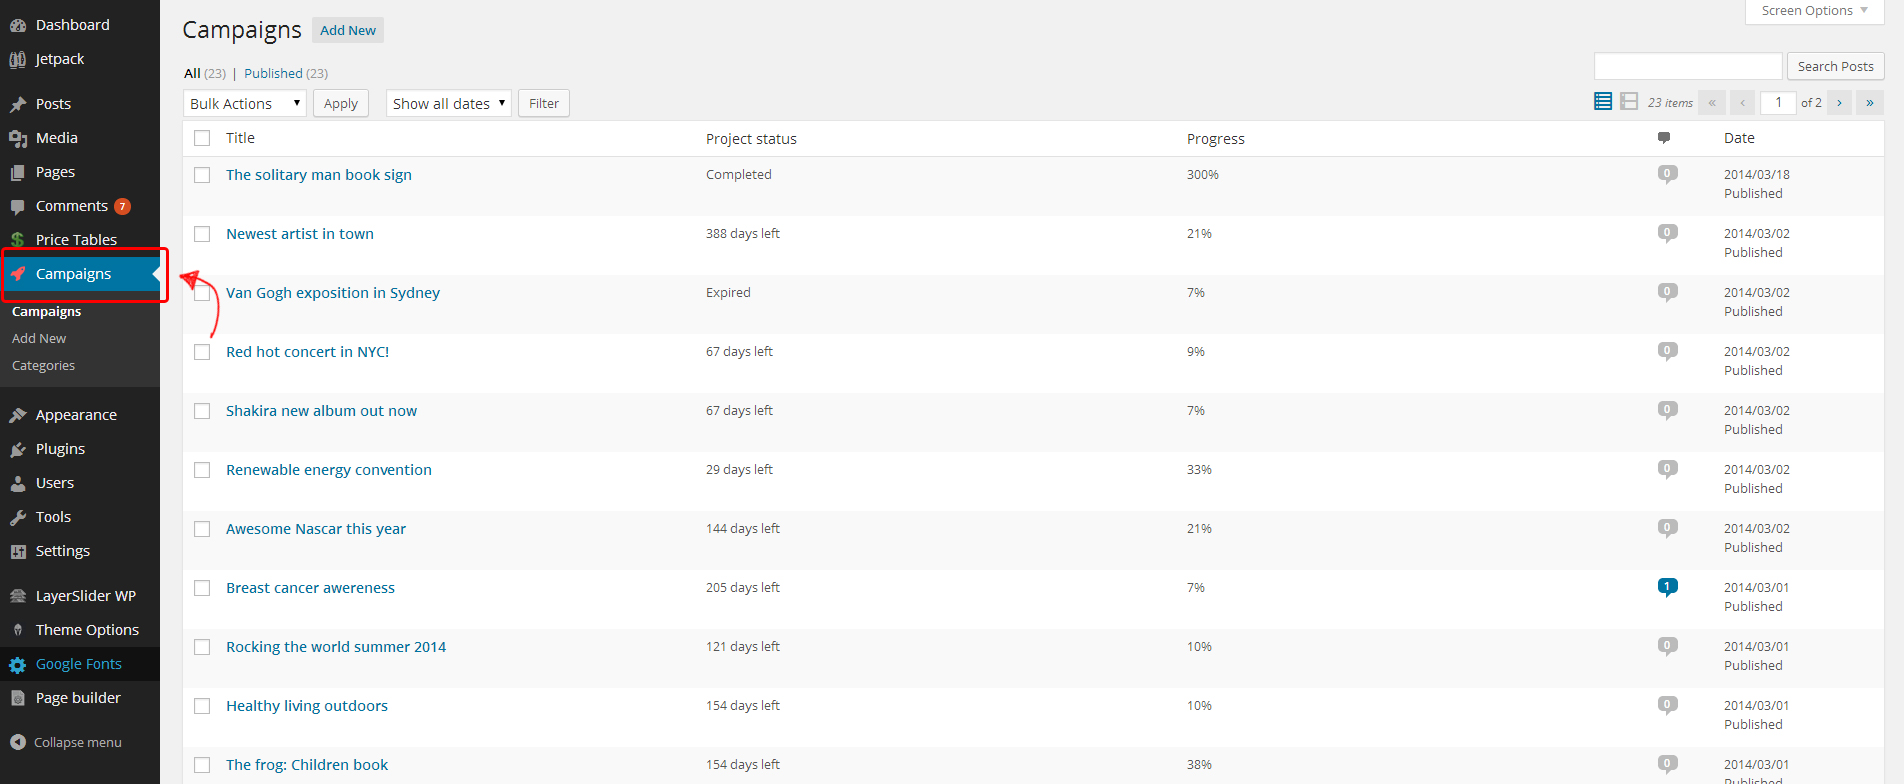
The campaigns page looks and works very similar as the posts section. However, in addition of the general information about the campaigns, you will also be able to see the status and progress of those.

One special mention is the staff picks. Inside the campaigns you will be able to see a "tick" called staff picks. If its enabled, the campaign will be shown in the latests campaign block in the page builder, if you have selected that option.
Forums - bbPress
To be able to have forums in your site, you will need to install bbPress, which is free plugin for Wordpress. Social Reach is fully compatible with bbPress, and you wont need to do any additional steps for it to look as the demo site.
How to create the blog page
Creating the blog page is very easy. Once you install the theme a category called blog will be automatically created:

- Go to categories and copy its ID from the URL. Check the number after. ex: tag_ID=2 the number we need is 2
- Then head to theme barracks and under general settings paste the ID into "blog category" field
- Click on Save all changes
- Head to the pages tab and create a new page
- Assign blog template to that page
- Publish and all done!

 WooCommerce - Set up your own shop
Now you can add your own shop to your site with WooCommerce compability. To get started you will need to install the fee WooCommerce Plugin, which you can do from your plugins section of your admin panel. Here is a list of the external documentation that you may need to work with WooCommerce:
- WooCommerce Plugin Page – This is the official WooCommerce plugin page
- WooCommerce Documentation- This is the WooCommerce Online documenation created by WooThemes
- WooComerce Commiunity Forums- This is the community forum for WooCommerce plugin created by WooThemes
- WooComerce Built-In Shortcodes- These are the included shortcodes for WooCommerce, our custom shortcodes are not included in this.
Price tables
The price tables follow the same principle as the page builder. Once you have created one, simply copy the code and paste it in the page where you want it to appear
To create a price table you need to:
- Click on the Portfolio link in the WP menu in your admin panel.
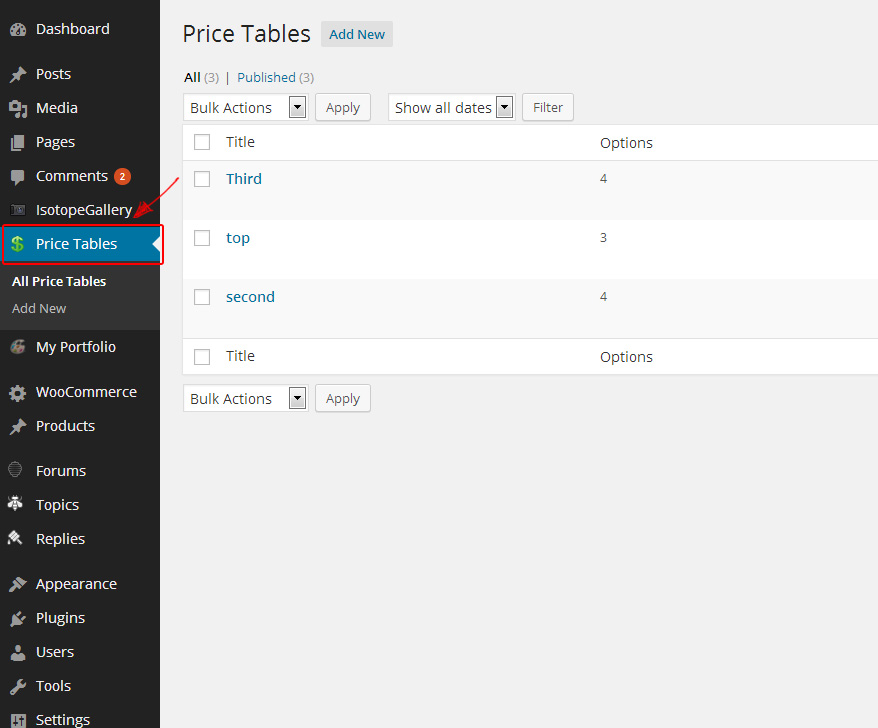
- Add a new table
- Start adding columns and add the information you want
- You can drag the columns and rows to re-arrange them.
- You can also add more features with the add link
- Once happy click on publish
- On the right side, under the publish button you will notice a code:
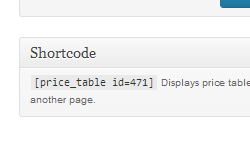
- Copy it and paste it in the page you want the table to appear
- Ta-da!
Widgets
This template supports 4 widget sidebards: 2 general, 1 for the blog and 1 for WooCommerce. The 2 general sidebars are there just in case you want to add some different sidebar to a page
Adding widgets is very easy, just head to 'Appearance' and then 'Widgets'.
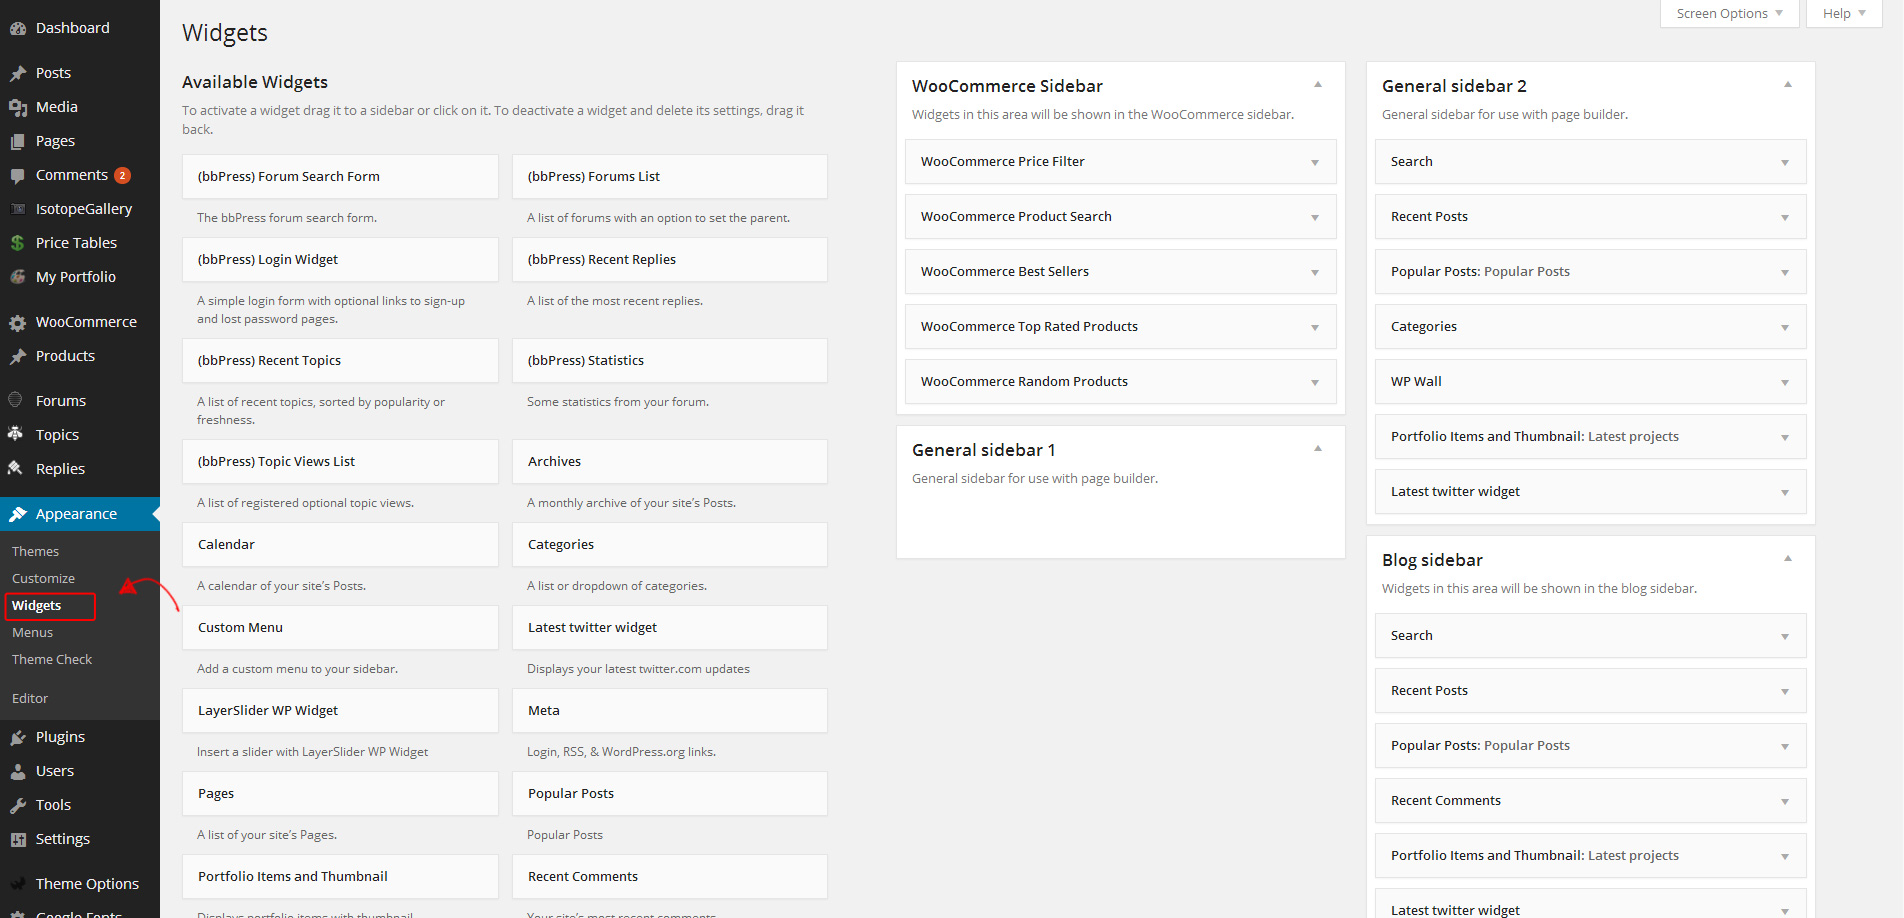
Here you will be able to drag and drop the widgets that you want in one of the four sidebars.
Further help
What we can help you with
We can help you with any questions about how the theme works and any bugs or errors you might find, for example:
- Which file is some particular code in?
- What can the theme do (or not do)?
- Are there future updates and enhancements planned?
- I found a bug/error!, etc.
What we cannot help you with
Themeforest does not require authors to give support in any way shape or form, nor does your purchase of a ThemeForest item come with any guarantee of support in any way. However, we still spend a great deal of time each week providing support to you guys because it's important to us that you guys get a top-notch product and service.
That said, it is not feasible for me time-wise to provide support beyond questions about how the theme works and fixing any bugs or errors. This includes:
- Customizing the theme
- Adding or modifying the theme functionality
- Teaching you how to use WordPress
- Teaching you how to use Adobe Photoshop or any image editing programs
- Support for external plugins.
Please do not abuse support
This support is provided completely free of charge. Please remember that a customized WordPress design would normally cost $1500-3000, and for $40-50 you are getting a bargain. For this reason, please do not expect us to tailor the theme to your individual needs, it is not physically possible to do this for each of you.
That said, if you find any errors or bugs, don't hesitate to let us know via the support forum and we will try to get it fixed as soon as possible. At the end of the day, we hope you guys enjoy using this template! If you are happy with it, please don't forget to rate it on ThemeForest! (We will love you forever ^^)

